


Most DC22 setups take under 15 minutes and require zero professional installation. This guide walks through every step — SIM activation, app pairing, OBD connection, and Live View testing — so you get it right the first time.
Insert the SIM Card
The DC22 ships with a pre-installed SIM card. Open the SIM slot on the camera body, verify the card is seated correctly (gold contacts facing down, notched corner aligned), and close the cover securely.
The SIM provides the 4G LTE connection needed for: remote Live View, GPS tracking, push alerts, two-way talk, and cloud backup. Without an active SIM, the DC22 still records locally to the SD card — but remote features will not be available.
Mount the Camera
Position the DC22 behind your rearview mirror, centered on the windshield. This location provides:
- Maximum road coverage from the front lens
- Clear interior view from the cabin-facing lens
- Better GPS reception near the top of the glass
- Minimal driver distraction — it stays in your peripheral vision, not your line of sight
Use the included 3M adhesive mount. Press firmly for 30 seconds. For best adhesion, clean the windshield with the provided alcohol wipe first and let the surface dry completely.
Connect the OBD Cable
Locate your vehicle's OBD-II port — usually found under the steering wheel, near the driver's knee area. Every car built after 1996 has one.
Plug the included OBD cable into the port. Route the cable along the dashboard trim, up the A-pillar, and across the windshield edge to the camera. Use the included cable clips to keep everything tidy.
Download and Set Up UBOX Pro
UBOX Pro is the companion app for DC22. It's available on both iPhone (App Store) and Android (Google Play).
- Search "UBOX Pro" in your app store and install
- Open the app and create an account (email + password)
- Tap Add Device
- Scan the QR code on the camera or quick start guide — or enter the device ID manually
Once paired, the camera appears on your app dashboard. The device name can be customized (e.g. "My Car" or "Work Van") for households with multiple DC22 units.
Activate 4G Data and GPS
After pairing, the UBOX Pro app will prompt you to activate the data plan. If you're using the included SIM, activation is handled directly through the app — no carrier visit needed.
Within 30–60 seconds of activation, you should see:
- ✅ 4G signal bars in the app
- ✅ GPS location updating on the map
- ✅ Camera status showing "Online"
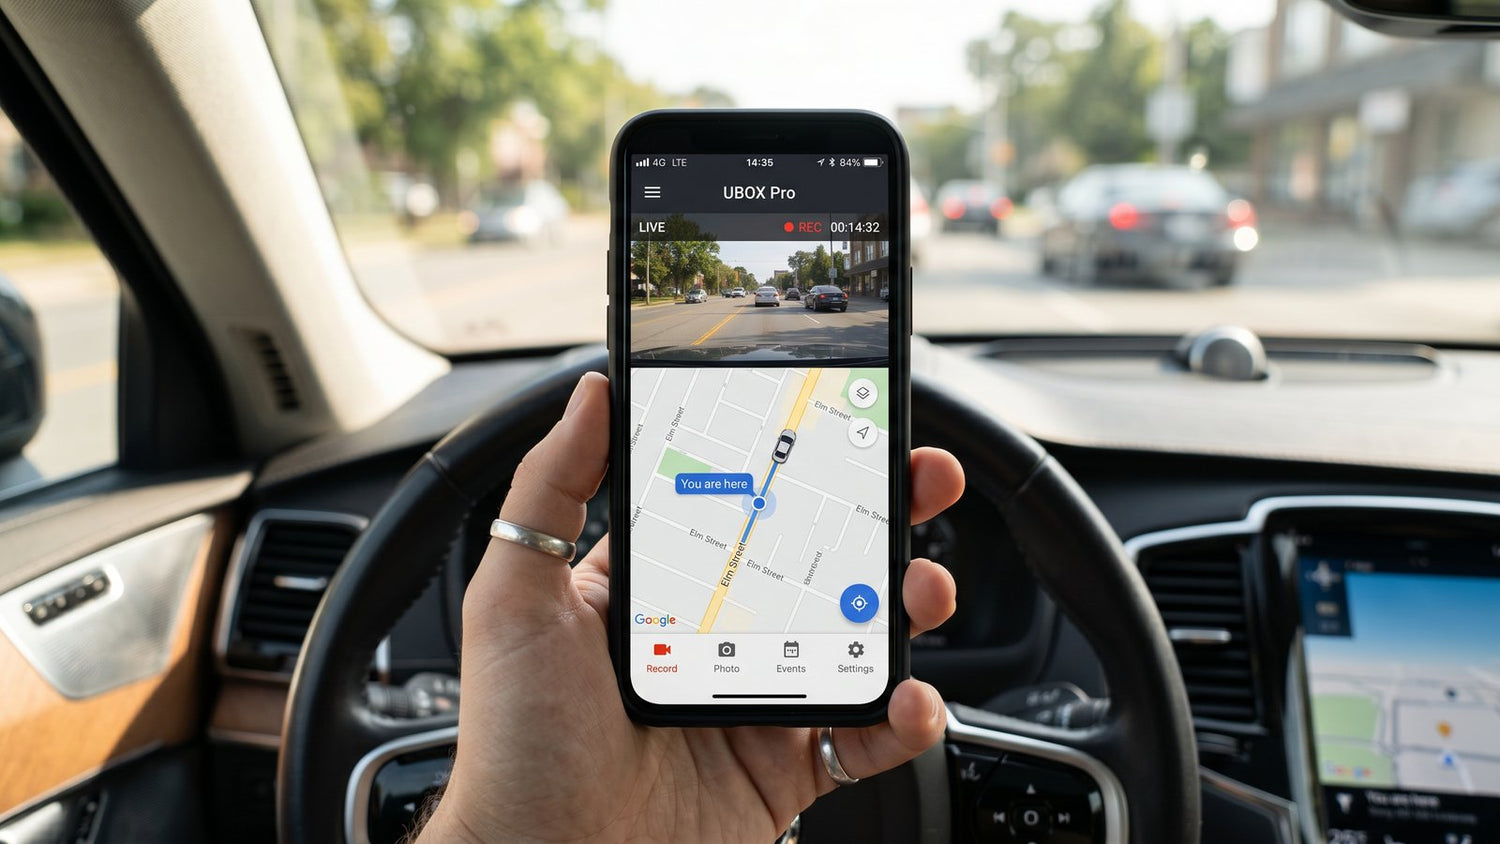
Test Live View
Live View is what makes DC22 different from a regular dash cam — it lets you see your car remotely from anywhere with an internet connection.
- Open UBOX Pro
- Select your DC22 from the device list
- Tap Live View
The feed should load within a few seconds. You can switch between the front and interior cameras, take a snapshot, or use two-way talk to speak through the camera.
Test this before you finish — walk away from the car with your phone and confirm the feed loads over cellular data (not just Wi-Fi).

Quick Checklist: Is Your DC22 Ready?
| Check | What to Confirm |
|---|---|
| ✅ Power | Camera turns on when OBD is connected |
| ✅ SIM | 4G signal bars visible in UBOX Pro |
| ✅ GPS | Location updates correctly on the map |
| ✅ Live View | Video feed loads over cellular data |
| ✅ Alerts | Push notifications enabled in app settings |
| ✅ SD Card | Recording indicator shows storage is active |
Common First-Time Setup Issues
"The app can't find my camera"
Make sure Bluetooth and location permissions are enabled for UBOX Pro on your phone. On Android, "Nearby devices" permission may also be required.
"Live View shows a black screen"
This usually means the 4G data connection is not yet active. Wait 1–2 minutes after SIM activation, then retry. If the problem persists, check the data plan status in UBOX Pro under Device Settings.
"GPS location is not updating"
Initial GPS lock can take 1–3 minutes in a new location. Move the vehicle to an area with a clear view of the sky, away from tall buildings or underground parking.

What Works Immediately vs What Needs Setup
| Feature | Works Right Away | Needs Setup |
|---|---|---|
| Local SD card recording | ✅ Yes | — |
| Remote Live View | — | SIM + App |
| GPS tracking | — | SIM + App |
| Push alerts | — | SIM + App |
| Two-way talk | — | SIM + App |
| Cloud backup | — | Data plan |
| 24/7 parking mode | ✅ Yes (OBD) | — |
Bottom Line
The DC22 was designed so that most drivers can complete the full setup — SIM, mount, OBD, app, and Live View — in under 15 minutes, with no professional help needed.
Don't want to activate a data plan right now? No problem. The DC22 works perfectly as a high-quality regular dash cam straight out of the box. Just mount it, connect the OBD cable, and it starts recording to the SD card automatically — dual 1080p front and interior footage, loop recording, and impact detection all function without any subscription or app setup. You can always activate the 4G data plan later when you're ready for remote Live View, GPS tracking, and real-time alerts.
Once the green checks in the checklist above are all ticked, your car is monitored and you can check in from anywhere.


Leave a comment
All comments are moderated before being published.
This site is protected by hCaptcha and the hCaptcha Privacy Policy and Terms of Service apply.